
…or how to give limited access to IT support teams to be able to self-serve obtaining the BitLocker Recovery key for someone’s hardware.
So I was given the challange to provide our first line team with the ability to be able to go into Intune and obtain a BitLocker recovery key for a device when it was needed to. We also just wanted to limit the team to just this one task.
Long-term, we are looking to building something into our IT Support portal to provide the bitlocker via the CI record in the CMDB of the IT Support portal. We did this for the CloudLAPS password. Theres a bit of work to do before we can add it in as we need to fully audit the BitLocker key access.
Pre-Requirements
- User (or group) needs an Intune licence assigned
- EntraID RBAC Role
- Intune Custom Role
Step 1 – Assign Licence
This is a straight forward task. For us, we created an EntraID group “Bitlocker Support” and then assigned an Intune licence to that group. This means any accounts we add into the group, will get that licence assignment automatically.
N.B For us, we have provided each team member a seperate account to provide this role to. This allows to us to provide seperation of duties between this privilaged role and their day to day account. Its these accounts that are added to the group
Step 2 – EntraID RBAC Role
We’ll need to create a customer RBAC role. This will give the rights to people assigned this role to be able to read the devices and the BitLocker key. To do this:
- Open up entra.microsoft.com (assuming you have the correct rights to create a custom role.)
- Go to Identity > Show More > Roles and Admins > Roles & Admins
- Click + New Custom Role
- Give the role a name
- When prompted for the permissions to grant, you’ll need the following roles:
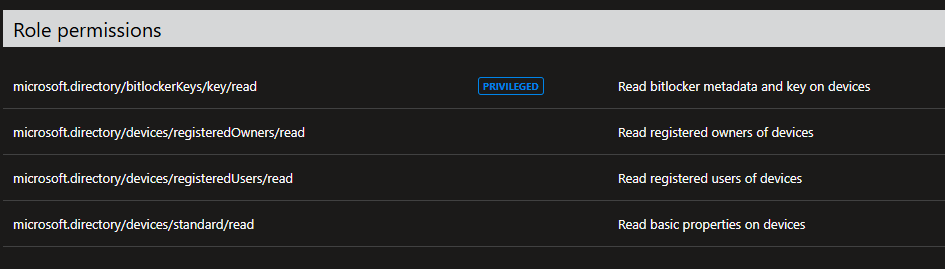
6. Save the role.
Step 3 – Custom Intune Role
This step we need to give permissions within Intune to allow our team to search and view the devices in Intune. To do this:
- Open intune.microsoft.com
- got to Tenant Administration > Roles
- Click + Create > Intune Role
- Give it a name and a description
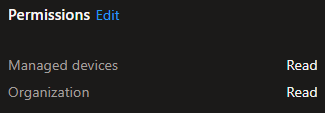
- On the next page, give it the permissions
- Assign the custom role to the group created in Step 1
- Save the role
Step 4 – Assign Role
Go to each user account and assign the RBAC role created in Step 2. Note the following:
- decide if they need access to a limited scope of devices or directory wide devices
- Decide if you are putting this behind Privilaged Identity Management (PIM) [ do this!! ]. If you are remember to uncheck “Permanent eligibility”
Once all this is done, the users can now log on with their privilaged account, request the self approving PIM and access the BitLocker key as needed.
The next step is reporting on the usage of this and auditing which we need to have to prove to our external auditors that we do. And this can be done via EntraID. And that will be a future blog.


Leave a comment